In case you landed here from Google, this page is a detailed companion/side-bar for this article series on Nest Microservices Custom Transporters.
To get the code associated with these examples, go here.
We'll start with a little editorial 😄
As mentioned in the article, it's not mandatory that you fully understand the nuances of transporting observables, but it definitely is fun and interesting. I want to take you on a journey to explore some of the nuances of Nest microservices transporters that aren't immediately obvious. I'll take this from two perspectives:
As a potential user of Nest microservices, you may have some questions about why you should use them at all. For example, what's the benefit of using something like the TCP Transporter vs. using REST (or GraphQL) over HTTP to hook up different Nest server apps? I know I had those questions when I first encountered Nest microservices. In fact, wanting to answer that was a big motivator for my extended research into Nest microservices.
As a developer of a custom transporter, you may want to know more about how the framework works so you can build components that fully leverage the Nest infrastructure.
Let's start with a use case. Consider that we want to implement a simple architecture like the following:
In this architecture, we have a remote service that completes multiple steps asynchronously. For example, the remote service may orchestrate a series of steps like:
- accept some inputs via an inbound request message
- assemble some tasks from the inputs
- make some REST API requests (or do other asynchronous work) to complete the tasks
- compose the results and return them in a response message
A good question to ask is how should I make requests from my nestHttpApp to my nestMicroservice ?
We might consider two possibilities:
- Make the remote app a basic Nest HTTP app server. We'll expose our services as REST endpoints, and use REST/HTTP as our transport between the services.
- Make the remote app a Nest microservice. We'll expose our services as microservice request handlers, and use a Nest microservice transporter to communicate between the two.
Let's consider some of the pro's and con's of these choices.
The REST/HTTP choice feels like a natural. We know it's proven, deployment-friendly, and we know Nest can handle both sides of the communication channel. On the requestor (nestHttpApp) side, we might use something like Axios (support built-in to Nest already) to make remote requests. For features like Quality of Service, Load Balancing and Failover, we can take advantage of cloud native features like Elastic Load Balancer, etc.
How does the Nest Microservices alternative hold up? Well, we'll have to admit it isn't as "proven" as the first alternative, but it's no less proven than Nest as a whole, so if you're in this boat, you might as well consider putting up all the sails. Where things get really interesting is the richness of the transporter communication layer, as compared to HTTP. This is not a knock on REST/HTTP at all, just an open-eyed comparison.
One example is that you can quickly implement load balancing and fault tolerance using the NATS transporter and its distributed queues feature. While you can certainly do this (use NATS) with the REST/HTTP alternative, you'd be doing this in your application code, not as a plugin at the transport level, completely transparent to the application. (Again, I'm not knocking the REST alternative, nor exploring every architectural alternative; I'm just trying to show the differences at the transport level).
A second example gets to some deeper differences. Let's consider the following requirement. We notice that our remote task takes a long time to run, and our users get restless. We would like, in our client app (the nestHttpApp above), to get notified of progress. For example, at the end of each step, we'd like to notify the user that the step completed.
In our HTTP app, we could take a few different approaches. We could decompose the server-side task and issue the individual requests from the client, taking some action upon completion of each step. Or, we could set up some sort of side channel sockety thing to have our nestMicroservice notify our nestHttpApp.
But really, this requirement feels tailor made for... reactive programming... like a job for
RxJS. What if... we could return an observable from the request, and stream the interim results back to our nestHttpApp, along with a final result when the steps are complete? Well guess what? Nest microservice transporters to the rescue!We'll explore this and some related topics in the samples below.
I hope you enjoy them, and that they provide good motivation for considering using Nest Microservices (and transporters), and some rationale for why custom transporters are implemented the way they are.
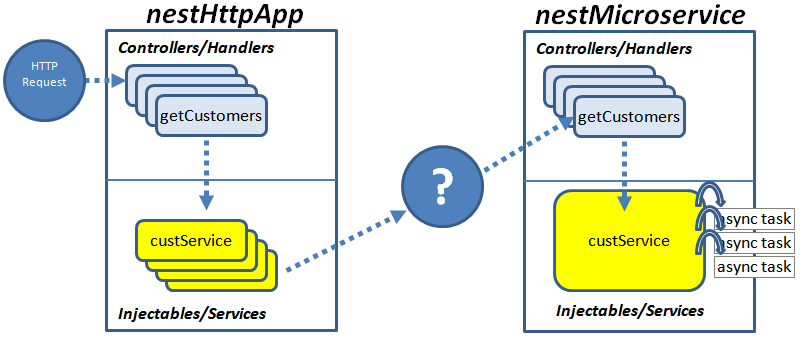
You'll notice on this branch that we've added a new project: nestHttpApp. This is a standard Nest HTTP app for serving HTTP requests like GET /customers. We'll be focusing a lot of attention on this app and the transporter component it uses (the ClientProxy) in the upcoming articles (Part 4: Basic Client Component and Part 5: Completing the Client Component. We've included it here, along with a full implementation of the client component (the one we'll be building from scratch in Parts 4 and 5) for testing purposes.
The tests will explore a simulation of the above architecture (well, the architecture is faithful, but we're simulating the asynchronous tasks).
In the next sections, I'll show you how to run these tests, and explain the results. If you don't want to run the tests, you can still follow the "flows" of each test by looking at the logs reproduced below.
To simulate the multi-step process, we introduce the WorkService. Open up nestMicroservice/src/work/work.service.ts. It's well documented, but basically it exports two methods that simulate asynchronous tasks of varying duration.
-
doStep(step, duration): Promise<any>This method simulates a single step. It accepts:
step: number: the step numberduration: number: the duration of a basic unit of work
It returns a promise that resolves with a result that looks like this:
{
  status: string, // a short description of the task result
  workTime: number, // the total time this step took
}
The time that a task takes is the product of
step*duration. For example:doStep(2, 3)// will resolve after 6 seconds (2 * 3).doStep(3, 3)// will resolve after 9 seconds (3 * 3).
-
doThreeSteps(duration): Promise<any>This method simulates a three step job, for convenience. It accepts a single parameter:
duration: number: the basic duration
It then runs a 3 step job, with the first job taking 1 * duration, the second taking 2 * duration and the third taking 3 * duration.
To run the tests, you'll want to use four different terminals. As I've mentioned elsewhere, I strongly encourage you to consider using tmux for this (I promise you'll be glad you spent the little bit of time getting to know it). Alternatively, start four terminal sessions using your terminal emulator of choice. I'll use the terminals as follows:
Terminal 1: start the Faye broker.
$ # from the faye-server directory
$ npm run start
Terminal 2: Use this to enter individual HTTP requests, as shown below, to nestHttpApp with curl or (my favorite) HTTPie. I include the HTTPie commands for reference in the nestHttpApp controller (nestHttp/src/app.controller.ts).
Terminal 3: launch the nestMicroservice app. This is the Nest responder app that handles incoming remote messages.
$ # from the nestMicroservice directory
$ npm run start:dev
Terminal 4: launch the nestHttpApp app. This is the Nest requestor app that handles issuing remote messages.
$ # from the nestHttpApp directory
$ npm run start:devEach test is really just a variation on a theme. To run one, we'll issue an HTTP request, and follow its progress through the components: from the nestHttpApp through the Faye broker to the nestMicroservice and back through the broker, finally ending back in the nestHttpApp, which will return an HTTP response to our original request.
Each test explores how Nest handles various ways in which the nestMicroservice app can respond to the same basic type of request.
Open up nestMicroservices/src/app.controller.ts and examine the message handlers under the section labeled Following are handlers for our Observable deep dive. They're shown below. Each of them essentially calls the same asynchronous tasks, but returns them in a particular way -- which is the main subject of this deep dive. We'll make requests to each of these services from our nestHttpApp.
  @MessagePattern('/jobs-promise')
  doPromiseWork(duration): Promise<any> {
    return this.workService.doThreeSteps(duration);
  }

  @MessagePattern('/jobs-observable')
  doObservableWork(duration): Observable<any> {
    return from(this.workService.doThreeSteps(duration));
  }

  @MessagePattern('/jobs-stream')
  doStream(duration): Observable<any> {
    return new Observable(observer => {
      // build array of promises to run jobs #1, #2, #3
      const jobs = [1, 2, 3].map(job => this.workService.doStep(job, duration));

      // run the promises in series
      Promise.mapSeries(jobs, jobResult => {
        // promise has resolved (job has completed)
        observer.next(jobResult);
        return jobResult;
      }).then(results => {
        // all promises (jobs) have resolved
        //
        // generate final result
        const finalResult = results.reduce(
          (acc, val) => {
            return {
              jobCount: acc.jobCount + 1,
              totalWorkTime: acc.totalWorkTime + val.workTime,
            };
          },
          { jobCount: 0, totalWorkTime: 0 },
        );
        // send final result and complete the observable
        observer.next(finalResult);
        observer.complete();
      });
})Let's start with an easy one, and develop an eye for tracing the distributed message flow.
We're going to invoke the '/jobs-promise' handler in our microservice by making the following remote request (from nestHttpApp/src/app.controller.ts):
  @Get('jobs-promise/:duration')
  promise(@Param('duration') duration) {
    return this.client.send('/jobs-promise', duration);
  }
This is going to run our 'jobs-promise' handler from nestMicroservice/src/app.controller.ts:
  @MessagePattern('/jobs-promise')
  doPromiseWork(duration): Promise<any> {
    return this.workService.doThreeSteps(duration);
  }
As we mentioned earlier this.workService.doThreeSteps(duration) returns a promise that resolves after the 3 steps have completed. Here, we're directly returning that promise.
To run this test, in terminal 2, run the following HTTPie command (or equivalent with curl or postman):
$ # from directory nestHttpApp
$ http get localhost:3000/jobs-promise/1   # 1 is the base duration
The response should look like:
{
  "jobCount": 3,
  "totalWorkTime": 6
}
In this test, the microservice is returning a promise that resolves after 3 seconds. This is because we run 3 jobs in parallel, job 1 taking 1 second, job 2 taking 2 seconds, and job 3 taking 3 seconds. The promise resolves after all 3 jobs have completed, which is after the longest job completes since they're in parallel.
The easiest way to see that the job took 3 seconds is to look at the timestamps on the outbound and inbound messages on the nestHttpApp console log (I modified the log slightly for readability):
[Nest] **9:27:12** AM [OutboundMessageI] -->> Serializing outbound message:
{"pattern":"/jobs-promise","data":"1","id":"239cfc10-1635-4079-bb49-2c67cbf8f538"}
[Nest] **9:27:15** AM [InboundResponse] <<-- deserializing inbound response:
{"err":null,"response":{"jobCount":3,"totalWorkTime":6},"isDisposed":true,"id":"239cfc10-1635-4079-bb49-2c67cbf8f538"}
You can also see the same thing (though you see inbound followed by outbound) by looking at the log for nestMicroservice in terminal 3.
In fact, you can trace the entire message flow through Faye in terminal 1.
The final HTTP result includes a field called totalWorkTime, which is the sum of the time of each task (1 + 2 + 3). So for this request the result is 6.
To check your understanding, run the request again, changing the duration to 2 units:
$ # from directory nestHttpApp
$ http get localhost:3000/jobs-promise/2   # 2 is the base duration
The elapsed time should be 6 seconds, and the HTTP response should look like:
{
  "jobCount": 3,
  "totalWorkTime": 12
}
In this case, we're running 3 tasks:
- task 1, takes 2 seconds (base duration 2 * 1)
- task 2, takes 4 seconds (base duration 2 * 2)
- task 3, takes 6 seconds (base duration 2 * 3)
So the totalWorkTime is 2 + 4 + 6 = 12, and the elapsed time is the length of the longest task (6).
OK, that was all just preliminaries to get a feel for our multi-step task.
For this test, we're going to be making the following remote request (from nestHttpApp/src/app.controller.ts):
  @Get('jobs-promise-observable/:duration')
  async promise2(@Param('duration') duration, @Response() response) {
    const coldStream$ = this.client.send('/jobs-promise', duration);
    this.logger.log('Waiting 5 seconds before launching request...');

    // sleep 5 seconds, then launch
    setTimeout(() => {
      this.logger.log('... now launching request');
      // subscribing launches the request
      // since we are handling the response manually, we use @Response
      coldStream$.subscribe(resp => response.json(resp));
    }, 5000);
  }
Here, we're issuing the same remote request (this.client.send('/jobs-promise', duration);) as in the first test. However, instead of returning that result directly, we're capturing it as an observable in coldStream$.
We then wait 5 seconds and subscribe to the observable.
This confirms two important facts:
- Even though we return a promise from the microservice, Nest converts it to an observable.
- The observable is cold, which means the request doesn't actually launch until we subscribe to it.
To run the test, in terminal 2, run the following HTTPie command (or equivalent with curl or postman):
$ # from directory nestHttpApp
$ http get localhost:3000/jobs-promise-observable/1 # 1 is the base durationFor this test, we're going to invoke the '/jobs-observable' handler in our microservice by making the following remote request (from nestHttpApp/src/app.controller.ts):
  @Get('jobs-observable/:duration')
  jobsObservable(@Param('duration') duration) {
    return this.client.send('/jobs-observable', duration);
  }
This time, the remote handler returns an observable instead of a promise. We do this with the RxJS from operator (in the nestMicroservice handler).
  @MessagePattern('/jobs-observable')
  doObservableWork(duration): Observable<any> {
    return from(this.workService.doThreeSteps(duration));
  }
To run the test, in terminal 2, run the following HTTPie command (or equivalent with curl or postman):
$ # from directory nestHttpApp
$ http get localhost:3000/jobs-observable/1   # 1 is the base duration
The semantics of this request are identical to the first test, where we returned a promise. Nest handles all this under the covers, automatically for us. Thus the timing and results are the same as in the first test.
This might be a bit of a yawn on the surface, but under the covers it's remarkable that Nest is handling all of this marshalling for us in a transparent fashion. And this leads us to our big finish...
For this test, we're going to invoke the '/jobs-stream' handler in our microservice.
Let's start by understanding the implementation of that handler (from nestMicroservice/src/app.controller.ts):
  doStream(duration): Observable<any> {
    return new Observable(observer => {
      // build array of promises to run jobs #1, #2, #3
      const jobs = [1, 2, 3].map(job => this.workService.doStep(job, duration));

      // run the promises in series
      Promise.mapSeries(jobs, jobResult => {
        // promise has resolved (job has completed)
        observer.next(jobResult);
        return jobResult;
      }).then(results => {
        // all promises (jobs) have resolved
        //
        // generate final result
        const finalResult = results.reduce(
          (acc, val) => {
            return {
              jobCount: acc.jobCount + 1,
              totalWorkTime: acc.totalWorkTime + val.workTime,
            };
          },
          { jobCount: 0, totalWorkTime: 0 },
        );
        // send final result and complete the observable
        observer.next(finalResult);
        observer.complete();
      });
    })
Now let's take a look at our requestor (from nestHttpApp/src/app.controller.ts):
  @Get('jobs-stream/:duration')
  stream(@Param('duration') duration) {
    return this.client.send('/jobs-stream', duration).pipe(
      tap(step => {
        this.notify(step);
      }),
  }
To run the test, in terminal 2, run the following HTTPie command (or equivalent with curl or postman):
$ # from directory nestHttpApp
$ http get localhost:3000/jobs-stream/1   # 1 is the base duration