QuickUI is fully customizable and easy to configure.
- Vim: 8.2 or later.
- NeoVim: 0.4.0 or later.
Plug 'skywind3000/vim-quickui'
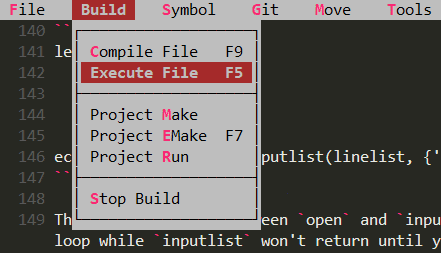
Displays a dropdown menubar at the top of the screen:
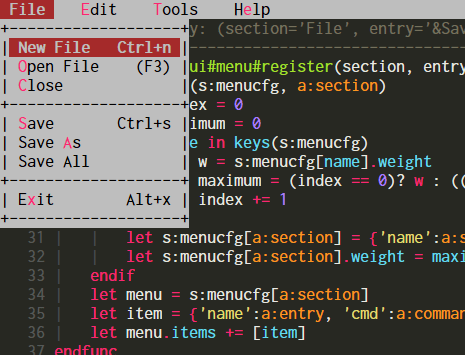
Usage:
h/CTRL+h/LEFT: move left.l/CTRL+l/RIGHT: move right.j/CTRL+j/DOWN: move down.k/CTRL+k/UP: move up.SPACE/ENTER: confirm.ESC/CTRL+[: cancel.H: move to the leftmost menu.L: move to the rightmost menu.J: move to the last item.K: move to the first item.
Note: hjkl may be overridden by user hotkeys, so CTRL+hjkl or arrow keys can be used at all times.
APIs:
Register menu entries:
call quickui#menu#install(section, items [, weight [, filetypes]])Display the menu:
call quickui#menu#open()Sample code:
" clear all the menus
call quickui#menu#reset()

" install a 'File' menu, use [text, command] to represent an item.
call quickui#menu#install('&File', [
            \ [ "&New File\tCtrl+n", 'echo 0' ],
            \ [ "&Open File\t(F3)", 'echo 1' ],
            \ [ "&Close", 'echo 2' ],
            \ [ "--", '' ],
            \ [ "&Save\tCtrl+s", 'echo 3'],
            \ [ "Save &As", 'echo 4' ],
            \ [ "Save All", 'echo 5' ],
            \ [ "--", '' ],
            \ [ "E&xit\tAlt+x", 'echo 6' ],
            \ ])

" items with tips; tips are shown in the cmdline
call quickui#menu#install('&Edit', [
            \ [ '&Copy', 'echo 1', 'help 1' ],
            \ [ '&Paste', 'echo 2', 'help 2' ],
            \ [ '&Find', 'echo 3', 'help 3' ],
            \ ])

" script inside %{...} will be evaluated and expanded in the string
call quickui#menu#install("&Option", [
			\ ['Set &Spell %{&spell? "Off":"On"}', 'set spell!'],
			\ ['Set &Cursor Line %{&cursorline? "Off":"On"}', 'set cursorline!'],
			\ ['Set &Paste %{&paste? "Off":"On"}', 'set paste!'],
			\ ])

" register HELP menu with weight 10000
call quickui#menu#install('H&elp', [
			\ ["&Cheatsheet", 'help index', ''],
			\ ['T&ips', 'help tips', ''],
			\ ['--',''],
			\ ["&Tutorial", 'help tutor', ''],
			\ ['&Quick Reference', 'help quickref', ''],
			\ ['&Summary', 'help summary', ''],
			\ ], 10000)

" enable tip display in the cmdline
let g:quickui_show_tip = 1

" hit space twice to open menu
noremap <space><space> :call quickui#menu#open()<cr>
Then you can open the menu by pressing space twice. If the 4th parameter filetypes is provided as a comma-separated list, the menu appears only when the current file type matches an entry in the list.
call quickui#menu#install('&C/C++', [
            \ [ '&Compile', 'echo 1' ],
            \ [ '&Run', 'echo 2' ],
            \ ], '<auto>', 'c,cpp')
This C/C++ menu is visible only when the filetype of the current buffer is c or cpp.
Menus can also be organized into multiple namespaces. The quickui#menu#open function accepts an optional argument:
call quickui#menu#open('abc')When invoked with the argument "abc", menus in the "abc" namespace are displayed. If the argument is omitted, the default namespace "system" is used.
Context menu imitates the Windows right-click menu and appears near the cursor:
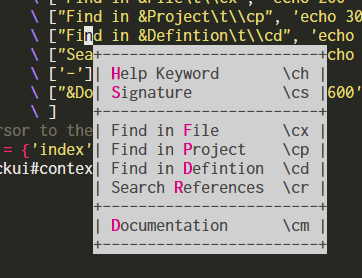
It is typically used to present commands relevant to the source code at the current line.
APIs:
Open the context menu:
quickui#context#open(content, opts)Parameter content is a list of [text, command] items. opts is a dictionary sharing the same options as listbox, with one addition:
ignore_case: ignore case when matching keywords, default 1.
Sample code:
let content = [
            \ ["&Help Keyword\t\\ch", 'echo 100' ],
            \ ["&Signature\t\\cs", 'echo 101'],
            \ ['-'],
            \ ["Find in &File\t\\cx", 'echo 200' ],
            \ ["Find in &Project\t\\cp", 'echo 300' ],
            \ ["Find in &Defintion\t\\cd", 'echo 400' ],
            \ ["Search &References\t\\cr", 'echo 500'],
            \ ['-'],
            \ ["&Documentation\t\\cm", 'echo 600'],
            \ ]
" set cursor to the last position
let opts = {'index':g:quickui#context#cursor}
call quickui#context#open(content, opts)
You can define your own context menu and map it to K (overriding the default keywordprg command) for a much more powerful K command.
The dialog widget provides a data-driven dialog system with 7 control types (label, input, radio, check, button, separator, dropdown). Declare controls as a list of dicts, and get all values back as a dictionary.
For the complete API reference, control type details, and examples, see the Dialog Guide.
When you have hundreds of items to deal with, a menu cannot hold them all — use a listbox instead.
Features:
- Pick an item from thousands of entries.
- Columns separated by
"\t"are automatically aligned. - A scroll bar appears when there are too many items.
- Mouse wheel scrolls the content.
- Characters prefixed with
&serve as shortcuts. - Has a title and can be dragged with the mouse.
- Search items with
/or?. - Jump to a line number with
:.
Usage:
j/CTRL+j/UP: move up.k/CTRL+k/DOWN: move down.J/CTRL+d: half page down.K/CTRL+u: half page up.H/CTRL+b/PageUp: page up.L/CTRL+f/PageDown: page down.SPACE/ENTER: confirm.ESC/CTRL+[: cancel.g: go to the first item.G: go to the last item./: search forwards.?: search backwards.:: go to line number.n/CTRL+n: next match.N/CTRL+p: previous match.
Note: hjkl or n may be overridden by user hotkeys, so CTRL+hjkl or CTRL+n can always be used.
APIs:
Open the listbox:
quickui#listbox#open(content, opts)Parameter content is a list of [text, command] items. opts is a dictionary of options:
title: title of the listbox.index: initial cursor position, starting from 0.w: listbox width.h: listbox height.col: screen position in columns, starting from 1.line: screen position in lines, starting from 1.color: background color, defaults toQuickBG.syntax: thefiletypeapplied to thelistbox.callback: a function ("fn(code)"form) called after the listbox closes (on Enter or ESC).
All options are optional. The callback function receives a parameter code representing the selected item index. If you quit (ESC/CTRL+[) without making a selection, code will be -1.
The internal variable g:quickui#listbox#cursor stores the last cursor position (index) in the listbox. It can be used to restore the previous location.
Sample code:
let content = [
            \ [ 'echo 1', 'echo 100' ],
            \ [ 'echo 2', 'echo 200' ],
            \ [ 'echo 3', 'echo 300' ],
            \ [ 'echo 4' ],
            \ [ 'echo 5', 'echo 500' ],
            \]
let opts = {'title': 'select one'}
call quickui#listbox#open(content, opts)
It can also work like the inputlist() function via quickui#listbox#inputlist, which returns the selected index immediately instead of executing a Vim command:
let linelist = [
            \ "line &1",
            \ "line &2",
            \ "line &3",
            \ ]
" restore last position in previous listbox
let opts = {'index':g:quickui#listbox#cursor, 'title': 'select'}
echo quickui#listbox#inputlist(linelist, opts)
The key difference is that open returns immediately to Vim's event loop, while inputlist blocks until you select an item or press ESC.
Textbox displays arbitrary text in a popup window.
Features:
- HJKL to scroll up/down, ESC to quit
- Supports syntax highlighting
APIs:
Open textbox:
quickui#textbox#open(textlist, opts)Run a shell command and display the output in the textbox:
quickui#textbox#command(command, opts)Sample code:
" display vim messages in the textbox
function! DisplayMessages()
    let x = ''
    redir => x
    silent! messages
    redir END
    let x = substitute(x, '[\n\r]\+\%$', '', 'g')
    let content = filter(split(x, "\n"), 'v:key != ""')
    let opts = {"close":"button", "title":"Vim Messages"}
    call quickui#textbox#open(content, opts)
endfunc
This function displays Vim messages (:messages) in a text window:
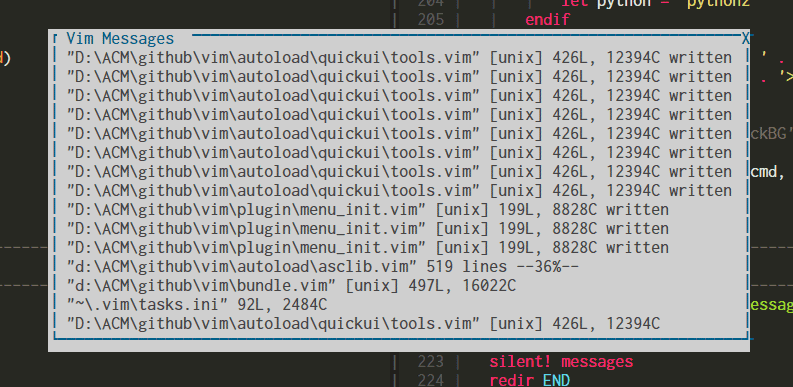
Navigating the messages with HJKL or PageUp/PageDown is much handier than listing them in the command line with :messages.
The preview window replaces the traditional :pedit command, displaying a file in a small popup window near your cursor:
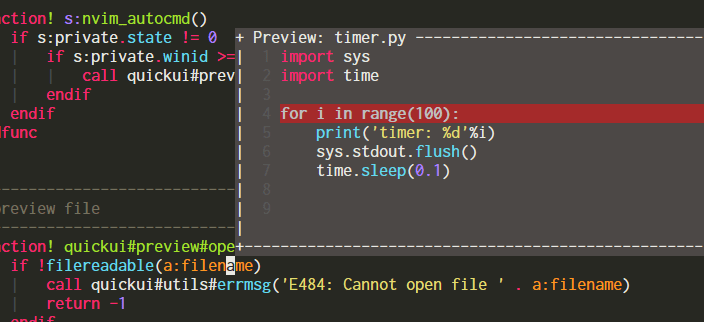
You can open the preview window with:
quickui#preview#open(filename, opts)It won't interfere with your work and closes automatically when you move the cursor. The second parameter opts is a dictionary with the following options:
| Option | Type | Default | Description |
|---|---|---|---|
| cursor | Number | -1 | If set above zero, that line is highlighted (using cursorline). |
| number | Number | 1 | Set to zero to disable line numbers |
| syntax | String | unset |
Syntax file type, e.g., cpp or python |
| title | String | unset |
Title for the preview window |
| persist | Number | 0 | By default the preview window closes automatically on CursorMoved. Set to 1 to close it manually with quickui#preview#close() |
| col | Number | unset |
Window position (column) |
| line | Number | unset |
Window position (line) |
| w | Number | unset |
Window width |
| h | Number | unset |
Window height |
Syntax highlighting and cursorline are especially useful when peeking at symbol definitions.
The filename argument can also be a list of strings. In that case, the preview window displays the list content, and the syntax field in opts can be used for highlighting.
You can scroll the content in the preview window with:
quickui#preview#scroll(offset)Parameter offset is an integer: positive to scroll down, negative to scroll up.
Prompts the user to input a string in a TUI box:
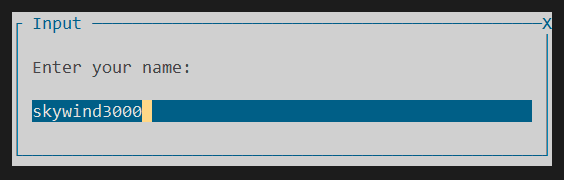
Can serve as a drop-in replacement for the input() function.
APIs:
quickui#input#open(prompt [, text [, history_key]])Sample code
echo quickui#input#open('Enter your name:', 'nobody')Usage:
Left/Ctrl+B: move cursor left.Right/Ctrl+F: move cursor right.Shift+Left: select left.Shift+Right: select right.Ctrl+g: select all.Up/Ctrl+P: previous history.Down/Ctrl+N: next history.Ctrl+Insert: copy to register*.Shift+Insert: paste from register*.Ctrl+K: kill all characters from cursor to end of line.Ctrl+D: delete character under cursor.Ctrl+W: delete word before cursor.Home/Ctrl+A: move cursor to the beginning.End/Ctrl+E: move cursor to the end.Ctrl+R Ctrl+W: read current word.Ctrl+R =: read evaluation.Ctrl+R {reg}: read register.
Another sample
function! SearchBox()
	let cword = expand('<cword>')
	let title = 'Enter text to search:'
	let text = quickui#input#open(title, cword, 'search')
	if text != ''
		let text = escape(text, '[\/*~^')
		call feedkeys("\<ESC>/" . text . "\<cr>", 'n')
	endif
endfunc
You can search text with this function without dealing with special character escaping.
The terminal widget lets you open a terminal in a popup window:
quickui#terminal#open(cmd, opts)Parameter cmd can be a string or a list. opts is a dictionary with the following options:
| Option | Type | Default | Description |
|---|---|---|---|
| w | Number | 80 | Terminal window width |
| h | Number | 24 | Terminal window height |
| col | Number | unset |
Window horizontal position |
| line | Number | unset |
Window vertical position |
| border | Number | 1 | Use 0 for no border |
| title | String | unset |
Window title |
| callback | String/Function | unset |
A function receiving the exit code when the terminal exits |
e.g.
function! TermExit(code)
    echom "terminal exit code: ". a:code
endfunc

let opts = {'w':60, 'h':8, 'callback':'TermExit'}
let opts.title = 'Terminal Popup'
call quickui#terminal#open('python', opts)
This runs python in a popup window:
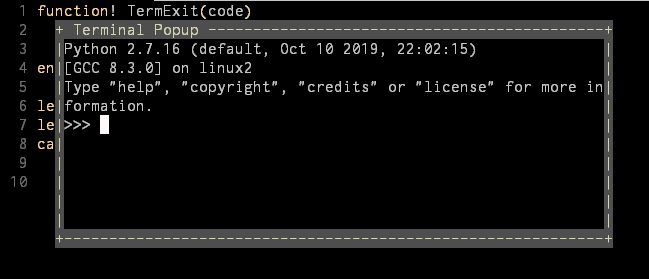
This feature requires Vim 8.2.200 (NeoVim 0.4.0) or later, enabling you to run various TUI programs in a popup window.
This widget presents the user with a dialog from which a choice can be made. It returns the number of the choice. For the first choice, this is 1.
quickui#confirm#open(msg, [choices, [default, [title]]])e.g.
let question = "What do you want ?"
let choices = "&Apples\n&Oranges\n&Bananas"

let choice = quickui#confirm#open(question, choices, 1, 'Confirm')

if choice == 0
	echo "make up your mind!"
elseif choice == 3
	echo "tasteful"
else
	echo "I prefer bananas myself."
endif
Result:
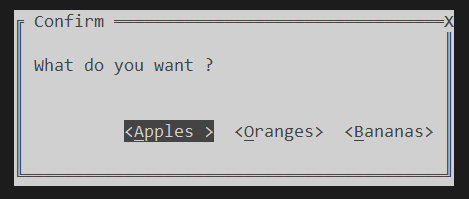
Use h and l to move the cursor, <space> or <cr> to confirm, and <ESC> to cancel. Mouse is also supported.
Tools are built on top of the basic widgets.
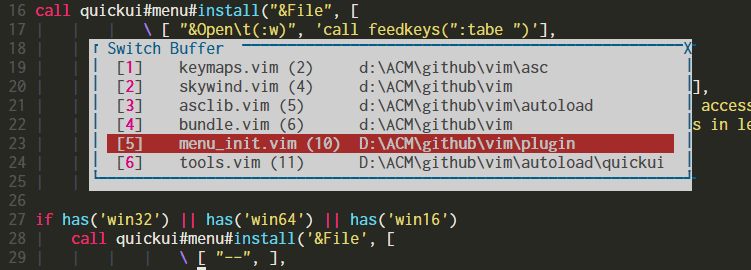
There is a built-in buffer switcher using listbox. Open it with:
call quickui#tools#list_buffer('e')
or
call quickui#tools#list_buffer('tabedit')
Use hjkl to navigate, enter/space to switch buffer, and ESC/CTRL+[ to quit:
If there are many buffers listed, you can use / or ? to search, and n or N to jump to the next / previous match.
Usage:
j/k: navigate.ESC/CTRL+[: quitEnter: open withswitchbufrules (override withg:quickui_switch_enter).Space: open withswitchbufrules (override withg:quickui_switch_space).CTRL+e: edit in current window.CTRL+x: open in a new split.CTRL+]: open in a new vertical split.CTRL+t: open in a new tab.CTRL+g: open with:dropcommand./: search.?: search backwards.
If you want to open a file in the current window when pressing Space, you can either change the switchbuf option or set g:quickui_switch_space manually:
let g:quickui_switch_space = ''Once defined, it overrides the switchbuf option. An empty string means edit in the current window.
:h switchbuf
For more information, see the help for switchbuf.
The function list can be activated with:
call quickui#tools#list_function()
The cursor starts at the current function:
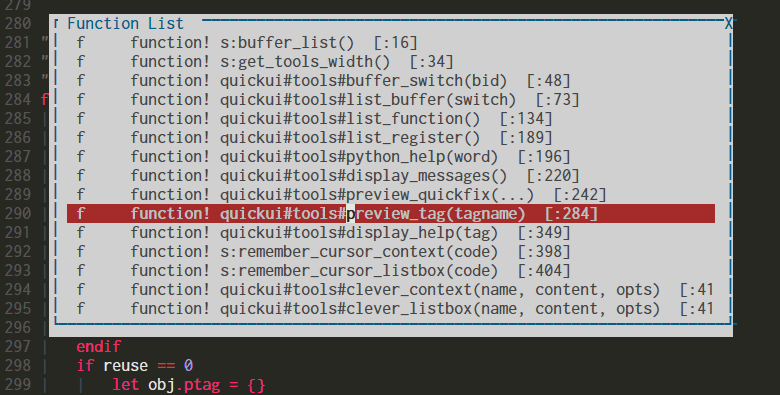
Navigate and press enter to jump to the selected function. This feature requires ctags in your $PATH.
Use textbox to display Vim help in a popup window:
call quickui#tools#display_help('index')
See the screenshot:
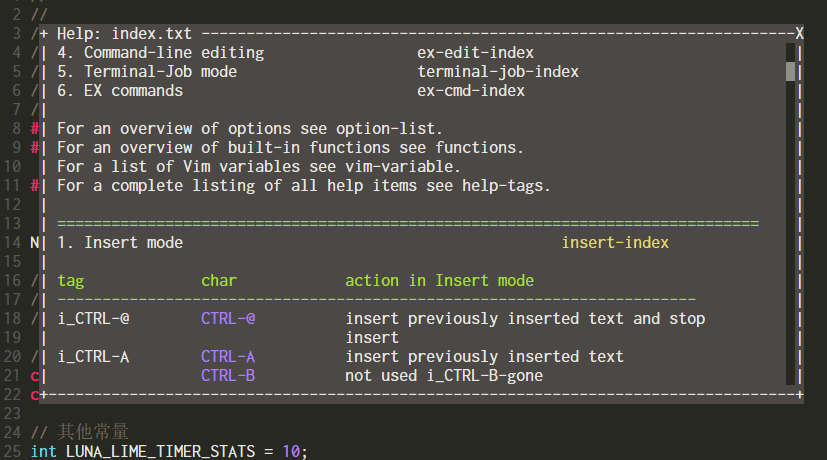
The only argument to display_help is the help tag name. With this tool, you can read help text at any time without creating a new split window.
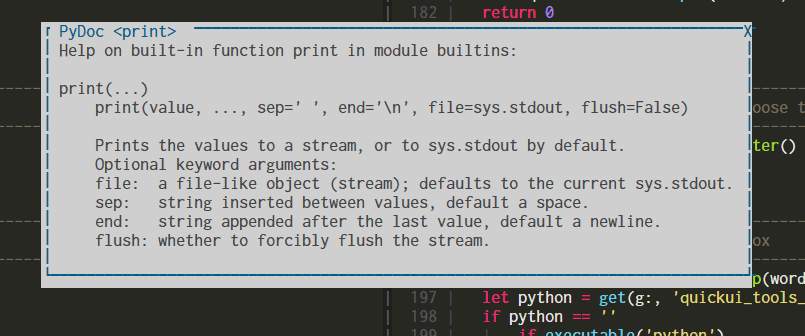
Sometimes you just want to glimpse the definition of the word under cursor without actually opening that file. The tag previewer was made for this:
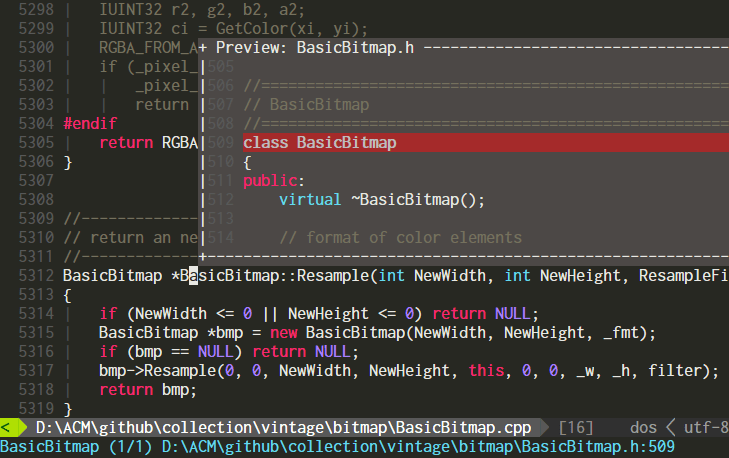
Use it like:
nnoremap <F3> :call quickui#tools#preview_tag('')<cr>When you move the cursor and press <F3>, the definition of the current <cword> is shown in the preview window. If there are multiple definitions, pressing <F3> again cycles to the next one. The command line shows the definition count and source file name.
Use quickui#preview#scroll to scroll the content in the preview window if you want to see more.
This feature requires ctags databases to be loaded correctly in Vim. The gutentags plugin can handle this automatically in the background.
If you have many items in the quickfix window, instead of opening them one by one, you can press p in the quickfix window to preview them in a popup:
augroup MyQuickfixPreview
  au!
  au FileType qf noremap <silent><buffer> p :call quickui#tools#preview_quickfix()<cr>
augroup END
This sets up a p keymap in the quickfix window to preview items. Press p again to close the preview window.
Change border characters:
let g:quickui_border_style = 1 (default)

let g:quickui_border_style = 2
let g:quickui_border_style = 3
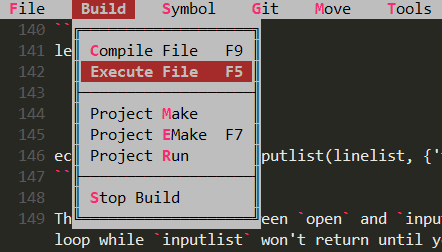
To change the color scheme, set the following option:
let g:quickui_color_scheme = 'borland'
The default color scheme is "borland".
Available color schemes:
The default preview window width is 85 and height is 10. You can change them like this:
let g:quickui_preview_w = 100
let g:quickui_preview_h = 15
If none of the built-in color schemes suit your needs, you can define the color groups yourself in your .vimrc before the VimEnter event.
| Group | Meaning |
|---|---|
| QuickBG | Background color |
| QuickSel | Selector (or cursor) color |
| QuickKey | Hotkey (or shortcut-key) color |
| QuickOff | Disabled item color |
| QuickHelp | Tip text color |
The default "borland" color scheme is defined as:
hi! QuickBG ctermfg=0 ctermbg=7 guifg=black guibg=gray
hi! QuickSel cterm=bold ctermfg=0 ctermbg=2 gui=bold guibg=brown guifg=gray
hi! QuickKey term=bold ctermfg=9 gui=bold guifg=#f92772
hi! QuickOff ctermfg=59 guifg=#75715e
hi! QuickHelp ctermfg=247 guifg=#959173My name is Lin Wei, an open source advocate and Vim enthusiast. I started learning programming in the early 1990s. Borland's Turbo Pascal/C++ was the most popular IDE at that time, and I really enjoyed those days — coming home from school, powering on my computer, launching Turbo C++ 3.1, and learning how to make games in MS-DOS.
I even imitated Turbo C++ and made my own editor when I moved to Watcom C++:
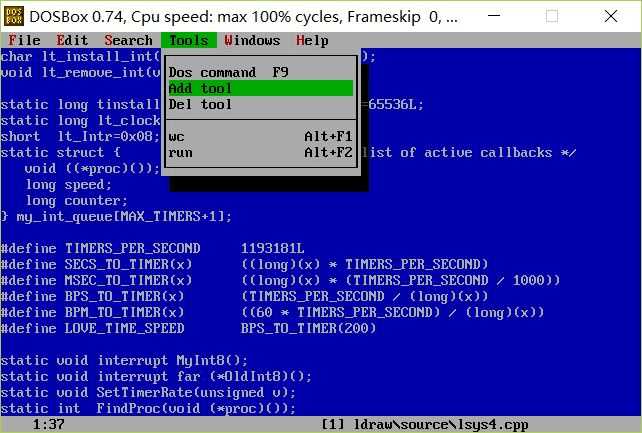
Because I didn't have a proper editor/IDE for Watcom C++ at that time.
After moving to Windows, I tried many GUI editors — from UltraEdit and EditPlus to Notepad++, from gedit to geany — but none fully satisfied me. Every day I was busy learning new IDEs, editors, or frameworks, and I had lost the true joy of programming. Then I discovered Vim and fell in love with it.
As Vim evolved, thanks to Bram's efforts, version 8.2 was released. I realized that maybe it was now possible to bring some of those cool things from 25 years ago into Vim. Maybe I could have a Borland/Turbo C++ flavored Vim in my everyday work, just like when I was a middle school student learning to make PC games in the golden 1990s.
It is time to bring these ideas to reality, starting with this plugin.
Like vim-quickui? Follow the repository on GitHub and vote for it on vim.org. And if you're feeling especially charitable, follow skywind3000 on Twitter and GitHub.